Crispy Homemade Chicken Tenders: The Ultimate 20-Minute Weeknight Win
Do you ever find yourself staring into the freezer, dreading the thought of another lackluster, pre-packaged dinner? We have all been there. You crave that intensely satisfying, audible crunch, perfectly juicy meat, and the deep comfort of a meal that feels like an indulgence—but you want to skip the heavy grease and hassle of a deep fryer. These Easy Homemade Chicken Tenders are your new secret weapon. Coming together in under 20 minutes with simple pantry staples, they deliver a mouthwatering, picture-perfect result that honestly tastes infinitely better than anything handed to you at a drive-thru window.
Why This Method Works
Many home cooks struggle with soggy breading that slides off or chicken that dries out entirely. We solve both of those common pitfalls with a simple, highly effective process engineered for flawless texture and flavor:
- The Coating Secret: By utilizing airy Japanese panko breadcrumbs instead of dense, traditional breadcrumbs, you achieve a significantly lighter, shatteringly crispy exterior that catches the light beautifully and holds its crunch long after leaving the pan.
- The Moisture Lock: Tossing the chicken strips in a delicate coat of premium olive oil before the breading process ensures the meat remains exceptionally tender. It creates a protective moisture barrier that keeps the natural juices sealed inside while the exterior achieves a rich, golden browning.
Ingredients
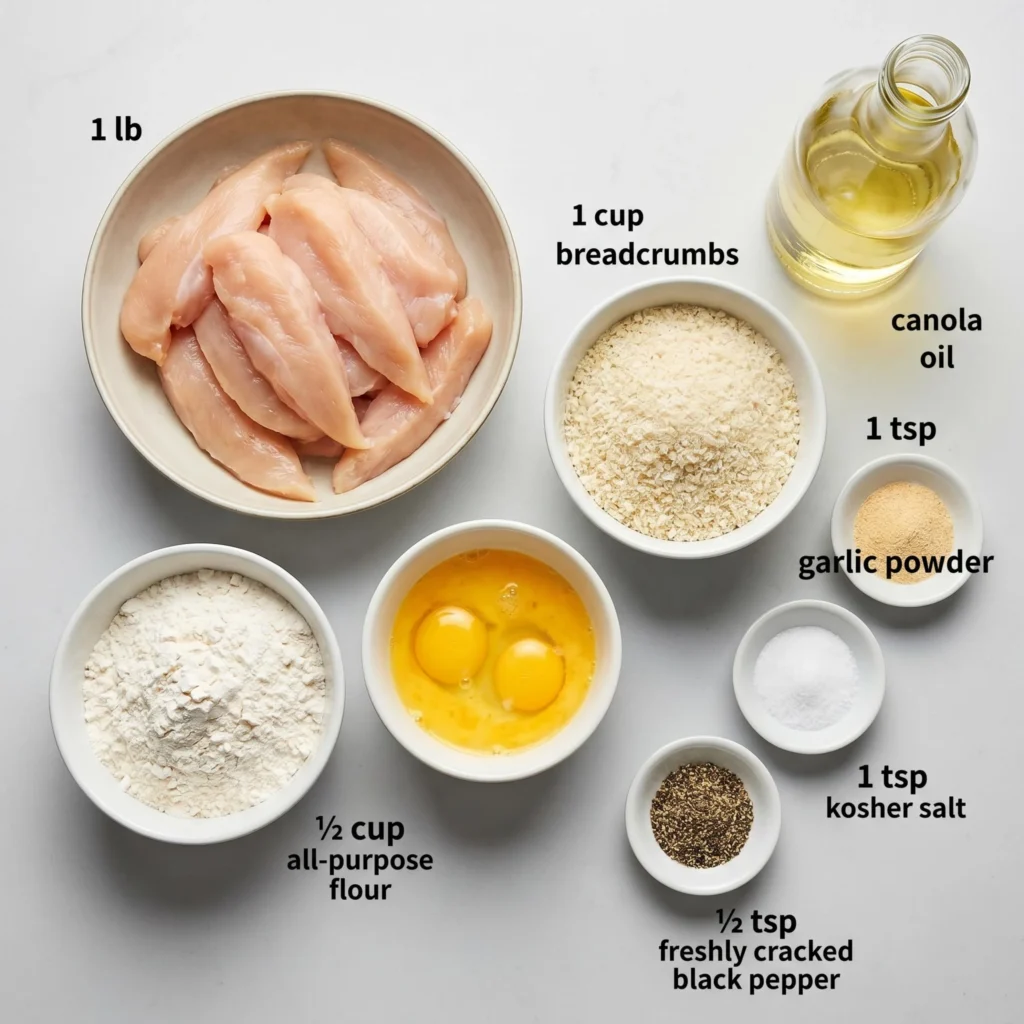
- 1 lb chicken breast: Carefully trimmed and sliced into uniform, 1-inch thick tenders.
- 1 cup panko breadcrumbs: The essential ingredient for that signature airy crunch.
- ½ cup all-purpose flour: To create the initial binding layer.
- 2 large eggs: Vigorously beaten until perfectly smooth.
- 1 tsp garlic powder: For a savory, aromatic depth of flavor.
- 1 tsp kosher salt: To properly season the meat from the inside out.
- ½ tsp freshly cracked black pepper: For a subtle, earthy bite.
- Oil for shallow frying: A neutral oil with a high smoke point (like canola, vegetable, or avocado oil) works best for a clean fry.
Directions
- Season: Generously season the raw chicken strips with the kosher salt, cracked black pepper, and garlic powder, ensuring every piece is evenly coated.
- Setup the Breading Station: Set up three separate, wide-brimmed bowls to keep your workspace organized: one for the flour, one for the thoroughly beaten eggs, and one for the panko crumbs.
- Coat: Working one at a time, lightly dredge each chicken strip into the flour (shaking off any excess), submerge it completely into the egg wash, and finally transfer it to the panko. Press the crumbs firmly into the meat to ensure a thick, unyielding crust.
- Heat the Oil: Heat a thin, even layer of your chosen frying oil in a heavy-bottomed skillet (cast iron is excellent here) over medium-high heat until it shimmers and gently pops when a breadcrumb is dropped in.
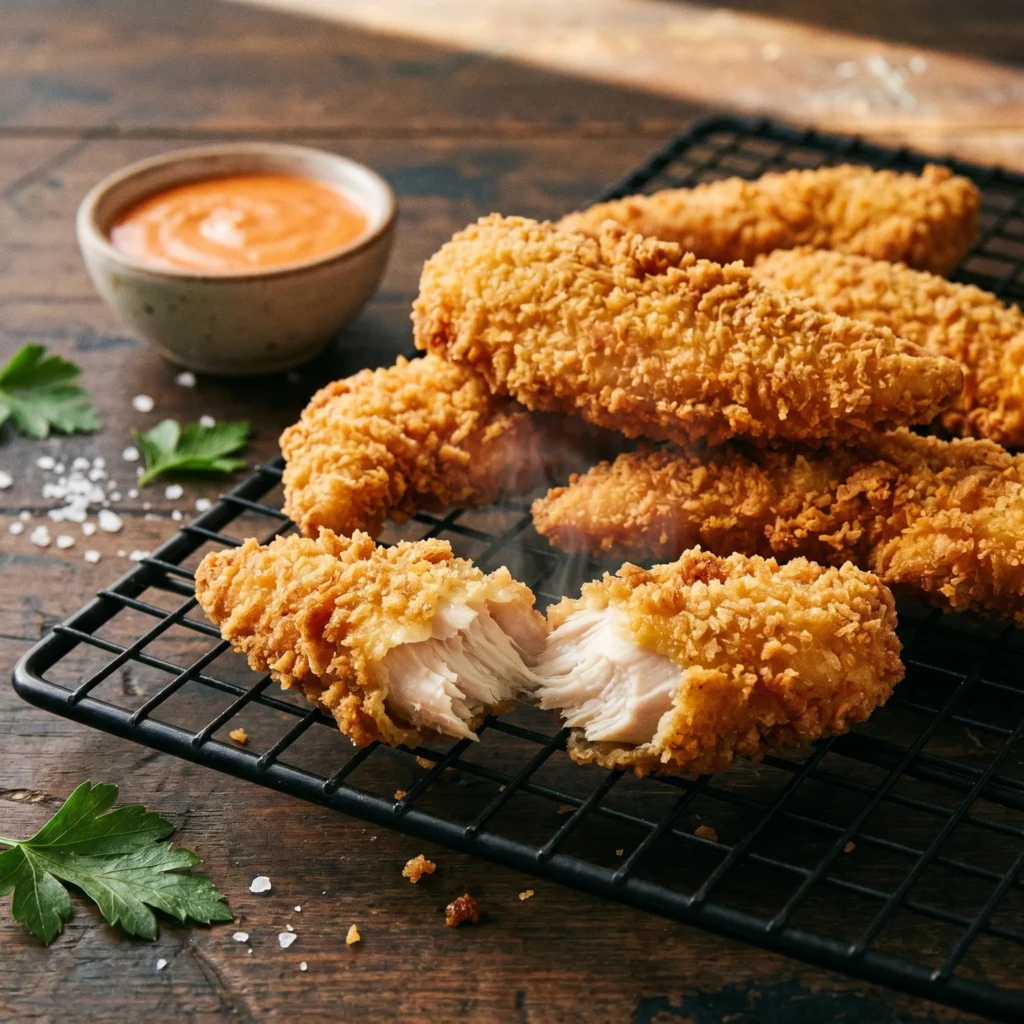
- Cook: Carefully lay the tenders into the hot oil, working in small batches so as not to overcrowd the pan. Fry for 3–4 minutes per side until they develop a deep, hyper-realistic golden-brown crust and reach an internal temperature of 165°F.
- Serve: Immediately transfer the cooked tenders to a wire cooling rack or a paper towel-lined plate to drain off excess oil, preserving that perfect crispness. Serve piping hot.
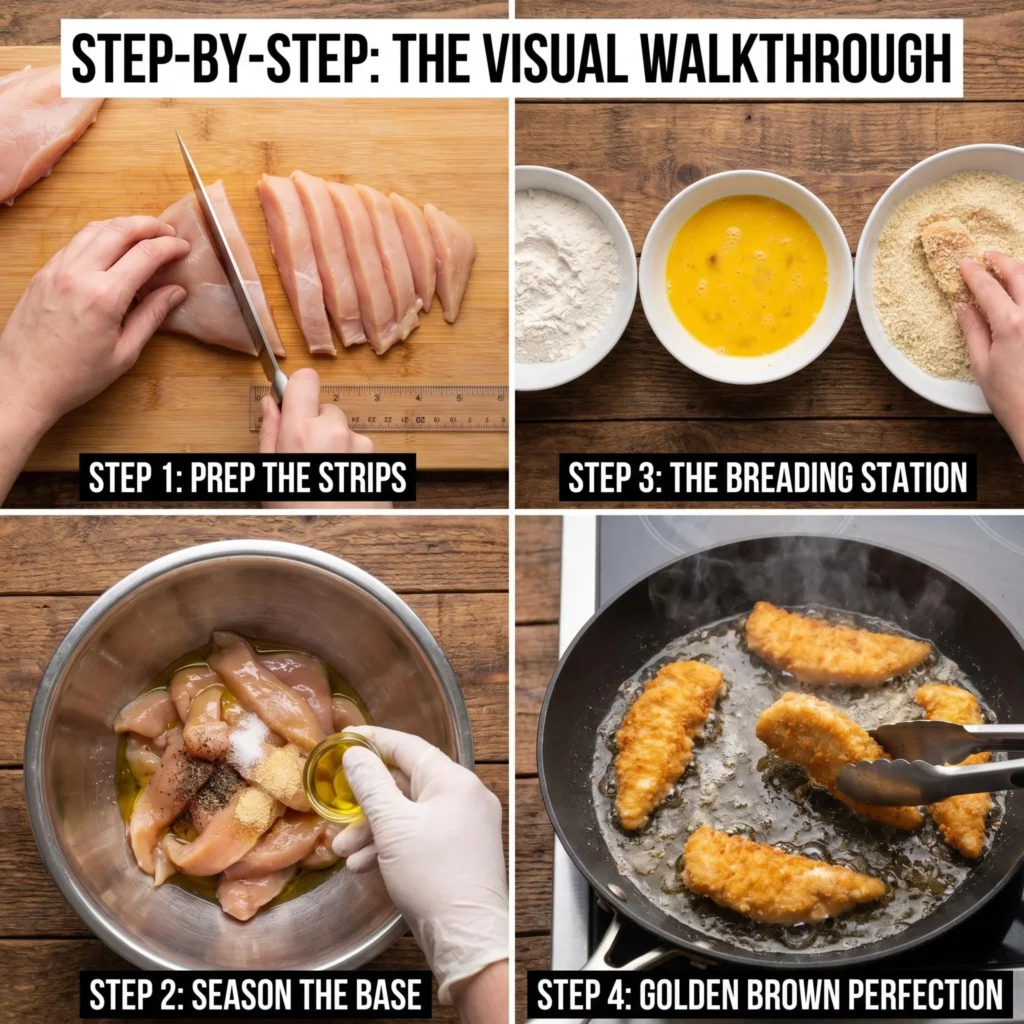
Step-by-Step: The Visual Walkthrough
- Prep the Strips: Slice your chicken breasts into precise, uniform strips (about an inch wide). This symmetry is crucial not only for an appealing presentation but for perfectly even cooking times.
- Season the Base: Toss the chicken in a prep bowl with a light drizzle of olive oil, salt, pepper, and garlic powder until glossy and well-seasoned.
- The Breading Station: The dredge-dip-press method is your foundation. Pressing the panko on firmly is the absolute secret to a flawless, camera-ready crust that refuses to flake off.
- Golden Brown Perfection: Pan-fry in a shallow layer of oil over medium-high heat. You are looking for a vigorous sizzle and a stunning, deep golden-brown hue before carefully flipping.
Recipe Card
Prep time: 10 minutes | Cook time: 10 minutes | Yields: 4 satisfying servings
3 Ways to Elevate Your Tenders
- The “Spicy Kick”: Whisk a teaspoon of smoked paprika and half a teaspoon of cayenne pepper directly into your flour mixture for a vibrant color and a lingering heat.
- The “Cheesy Crunch”: Stir a quarter cup of finely micro-grated, aged Parmesan cheese into your panko bowl. The cheese melts and crisps as it fries, adding a rich, nutty umami profile.
- The Herb Infusion: Crush a tablespoon of dried oregano, basil, or a robust Italian seasoning blend directly into the breading for a fragrant, aromatic twist.
Expert FAQ
“Can I bake these instead of frying?” Yes, absolutely! For a lighter alternative, place the breaded tenders on a wire rack set over a rimmed baking sheet. This allows hot air to circulate underneath. Bake at a high heat of 400°F (200°C) for 18–20 minutes, flipping exactly halfway through. Spray the tenders lightly with an oil mister before baking to mimic that fried crispiness.
“How do I keep the first batch warm without them getting soggy?” Never cover them with foil! Instead, place the finished tenders on a wire cooling rack set over a baking sheet and hold them in a preheated “warm” oven (around 200°F) until the entire batch is finished frying.
Join the Culinary Conversation
What is your absolute go-to dipping sauce for a perfectly fried chicken tender? Are you team classic ranch, tangy honey mustard, or something spicier? Drop a comment below and let’s talk flavor! If you loved this quick, high-quality dinner idea, make sure to check out my 10-Minute Dipping Sauce Collection next!